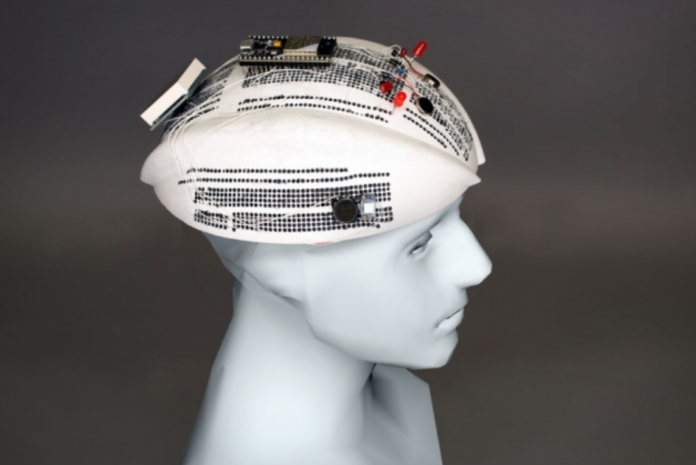
In order to provide a faster, easier way to test circuit functions and user interactions with products such as smart devices and flexible electronics, MIT researchers leverage 3D printed “curveboards” to facilitate the integration of electronics onto products.
The word “CurveBoards” come from the deformation of breadboards that have kept their pinholes shape for decades. The thing is that it is quite difficult to test how the electronics will look on smart devices.
Generally, people will first test circuits on traditional breadboards, then slap them onto a product prototype. If the circuit needs to be modified, it’s back to the breadboard for testing, and so on.
In a paper being presented at CHI (Conference on Human Factors in Computing Systems), the researchers describe “CurveBoards,” 3D-printed objects with the structure and function of a breadboard integrated onto their surfaces. Custom software automatically designs the objects, complete with distributed pinholes that can be filled with conductive silicone to test electronics. The end products are accurate representations of the real thing, but with breadboard surfaces.
CurveBoards “preserve an object’s look and feel,” the researchers write in their paper, while enabling designers to try out component configurations and test interactive scenarios during prototyping iterations. In their work, the researchers printed CurveBoards for smart bracelets and watches, Frisbees, helmets, headphones, a teapot, and a flexible, wearable e-reader.
“On breadboards, you prototype the function of a circuit. But you don’t have context of its form — how the electronics will be used in a real-world prototype environment,” says first author Junyi Zhu, a graduate student in the Computer Science and Artificial Intelligence Laboratory (CSAIL). “Our idea is to fill this gap, and merge form and function testing in very early stage of prototyping an object. … CurveBoards essentially add an additional axis to the existing [three-dimensional] XYZ axes of the object — the ‘function’ axis.”
Custom software and hardware
A core component of the CurveBoard is custom design-editing software. Users import a 3D model of an object. Then, they select the command “generate pinholes,” and the software automatically maps all pinholes uniformly across the object. Users then choose automatic or manual layouts for connectivity channels. The automatic option lets users explore a different layout of connections across all pinholes with the click of a button. For manual layouts, interactive tools can be used to select groups of pinholes and indicate the type of connection between them. The final design is exported to a file for 3D printing.
When a 3D object is uploaded, the software essentially forces its shape into a “quadmesh” — where the object is represented as a bunch of small squares, each with individual parameters. In doing so, it creates a fixed spacing between the squares. Pinholes — which are cones, with the wide end on the surface and tapering down — will be placed at each point where the corners of the squares touch. For channel layouts, some geometric techniques ensure the chosen channels will connect the desired electrical components without crossing over one another.
In their work, the researchers 3D printed objects using a flexible, durable, nonconductive silicone. To provide connectivity channels, they created a custom conductive silicone that can be syringed into the pinholes and then flows through the channels after printing. The silicone is a mixture of a silicone materials designed to have minimal electricity resistance, allowing various types electronics to function.
To validate the CurveBoards, the researchers printed a variety of smart products. Headphones, for instance, came equipped with menu controls for speakers and music-streaming capabilities. An interactive bracelet included a digital display, LED, and photoresistor for heart-rate monitoring, and a step-counting sensor. A teapot included a small camera to track the tea’s color, as well as colored lights on the handle to indicate hot and cold areas. They also printed a wearable e-book reader with a flexible display.
Better, faster prototyping
In a user study, the team investigated the benefits of CurveBoards prototyping. They split six participants with varying prototyping experience into two sections: One used traditional breadboards and a 3D-printed object, and the other used only a CurveBoard of the object. Both sections designed the same prototype but switched back and forth between sections after completing designated tasks. In the end, five of six of the participants preferred prototyping with the CurveBoard. Feedback indicated the CurveBoards were overall faster and easier to work with.
But CurveBoards are not designed to replace breadboards, the researchers say. Instead, they’d work particularly well as a so-called “midfidelity” step in the prototyping timeline, meaning between initial breadboard testing and the final product. “People love breadboards, and there are cases where they’re fine to use,” Zhu says. “This is for when you have an idea of the final object and want to see, say, how people interact with the product. It’s easier to have a CurveBoard instead of circuits stacked on top of a physical object.”
Next, the researchers hope to design general templates of common objects, such as hats and bracelets. Right now, a new CurveBoard must built for each new object. Ready-made templates, however, would let designers quickly experiment with basic circuits and user interaction, before designing their specific CurveBoard.
Image via Csail – MIT – Remember, you can post free of charge job opportunities in the AM Industry on 3D ADEPT Media or look for a job via our job board. Make sure to follow us on our social networks and subscribe to our weekly newsletter : Facebook, Twitter, LinkedIn & Instagram ! If you want to be featured in the next issue of our digital magazine or if you hear a story that needs to be heard, make sure to send it to contact@3dadept.com.


